TM 5-4520-253-13
REMOVE/lNSTALL HEAT EXCHANGER (CONT)
INSTALLATION:
1.
2.
3.
4.
5.
6.
7.
8.
9.
Install heat exchanger
Attach rear exchanger
washers (24).
exhaust shield (25) at exhaust end of heat exchanger (23).
cover (22) to rear of heat exchanger (23) with four screws with lock
Use sharp knife or similar cutting tool and cut old sealant from inside flange (26) of exchanger
housing shield (27). Cut old sealant from outside of burner head adapter ring (28).
Insert heat exchanger (23) into heater case and secure rear exchanger cover (22) using eight
screws with lock washers (21).
Burner head mounting surface must be free of sealant. If
sealant is deposited on mounting surface, remove immedi-
ately with wet rag.
Inject silicone sealant (29) between flange (26) and adapter ring (28) all the way around ring.
Smooth sealant with wet rag or wet finger.
Sealant will harden at room temperature.
Allow at least 8 hours hardening time before operating
heater.
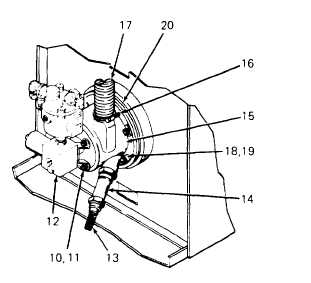
Do not tighten burner head mounting screws (18) until all
screws are loosely installed. Follow tightening instructions
exactly.
Loosely install burner head assembly (15)
and gasket (20) using five screws (18) and
pressure pads (19). Assembled parts
should barely touch.
Tighten every other screw (18) around
flange of burner head assembly (15) to
15.0 to 25.0 in. lb (1.7 to 2.8 N•m) of
torque until all screws have been
tightened.
Tighten every other screw (18) around
flange of burner head assembly (15) to
50.0 to 60.0 in. lb (5.7 to 6.8 N•m) of
torque until all screws have been
tightened.
4-70