TM 10-4520-261-12&P
SPACE HEATER ARCTIC (SHA)
0005 00
OPERATION UNDER USUAL CONDITIONS
0005 00-22
STRIKING THE FUEL SUPPLY SITE
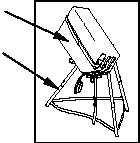
Unstrap and remove the fuel can (1) from fuel can stand (2); position the fuel can upright on ground.
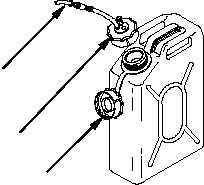
Disconnect the fuel supply hose (3) and fuel overflow hose (4) from the fuel flow control valve (5). Coil
fuel supply hose (3) and fuel overflow hose (4) from the heater (6) to the fuel supply site. Drain any
excess fuel back into the fuel can (1) by opening the priming valve (7) on the fuel supply hose (3) to allow
air to enter the hose (3). Be sure to close the valve (7) when done.
Disconnect fuel supply hose (3) from gravity feed adaptor (8). Connect the two connectors on the ends of
the fuel supply hose (5) together in order to keep the connectors free of any debris.
Unscrew and remove the adaptor (8) from fuel can (1) and install the fuel can cap (9). Set gravity feed
adaptor (8) aside for repacking in SHA.
Disassemble fuel can stand (2) as described earlier in this work package. Stow fuel can (1) and stand (2)
in authorized location.
In the event that fuel is spilled on the ground, immediate action must be taken to contain the spill and the
appropriate environmental personnel notified. Clean up any spilled fuel with a rag. Dispose of rag and/or
absorbent material in accordance with local Material Safety Data Sheet (MSDS) procedure.
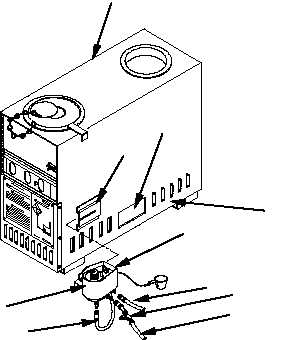
Disconnect valve discharge fuel hose (10) from valve (5). Slide valve (5) toward front of heater (6) and
remove valve (5) from sleeve (11). Before packing, drain any fuel remaining in the valve (5) into the fuel
can (1) by aligning the hole (12) on the rear side of the valve (5) over the open fuel can (1). Set valve (5)
aside for repacking. Insert the end of the valve discharge fuel hose (10) into the rectangular cutout (13)
on the side of the heater (6) and store the remaining hose (10) inside the heater compartment (14).
1
2
3
8
9
6
14
11
5
10
3
4
13
7
12