TM 9-2540-207-14&P
5.5.5
FUEL INJECTOR
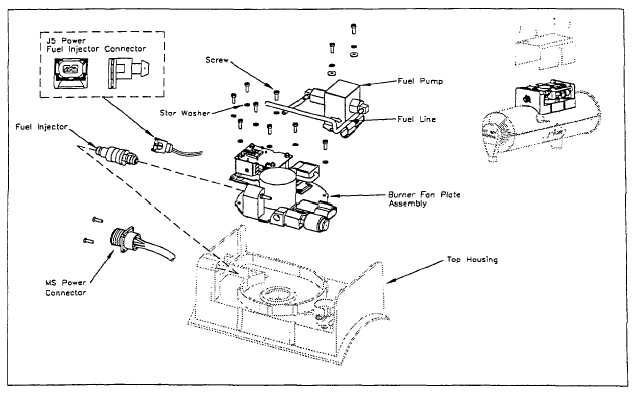
Figure 5-5.10. Fuel Injector
Removal
1.
Remove vehicle power cable from the MS Power connector.
2.
Remove Top Cover (ref. 5.1.1)
3.
Rotate the Fuel Injector so that the wiring connector is facing upwards.
4.
Remove Power Fuel Injector connector (J5).
Note: Use fingers to press the metal clip connector, and release TOWARDS the
Fuel Injector. Gently detach connector from Fuel Injector.
5.
Remove the two (2) fuel lines at the Burner Fan Plate fuel fittings.
6.
Remove the Fuel Pump Assembly (ref. 5.5.3)
7.
Using a #1 cross-tip screwdriver, unscrew the two (2) screws which hold the MS Power connector (J2) to the
Top Housing, and push the connector into the Top Housing.
8.
Free the Power Main Capacitor (C2) by loosening the bolt on the side of the Main Capacitor clamp.
9.
Using a #2 cross-tip screwdriver, remove the eight (8) screws from the Burner Fan Plate Assembly. Free the
Power Inductor (L1) from its damp.
10.
Move the Burner Fan Plate upwards and towards the Fuel Pump to allow the Fuel Injector to disconnect from the
Top Housing.
11.
Remove the Fuel Injector.
!WARNING!
NEVER place Burner Fan Plate Assembly on the Burner Fan Impeller. This may
cause warpage of the Impeller.
5-62


