TM 5-4520-253-13
REMOVE/lNSTALL/TEST CAPACITORS
TEST EQUIPMENT: Volt ohmmeter
TOOLS: Tool kit, service, refrigeration unit
NSN 5180-00-596-1474
Solder gun kit
NSN 3439-00-930-1638
MATERIALS/PARTS: Solder (Item 12, Appendix E)
EQUIPMENT CONDITION:
Page
Condition Description
4-40
Combustion blower and housing
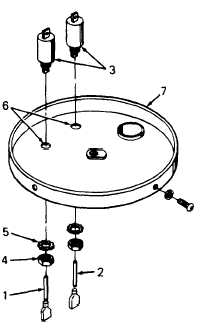
REMOVAL:
1.
Unsolder yellow wire (1) and white wire (2) from ter-
minals of capacitors (3).
2. Remove nut (4) and lock washer (5) from each
capacitor (3). Lift out capacitors.
INSTALLATION:
1.
Install each capacitor (3) in mounting hole (6) with
threaded terminal projecting outside cover (7).
Secure each capacitor using nut (4) and lock
washer (5).
2. Solder yellow wire (1) and white wire (2) to terminals
of capacitors (3) as shown.
TESTING:
For test purposes, it is not necessary to unsolder wires (1
and 2) and remove capacitors from cover (7). Test as
follows:
1.
2.
Use volt ohmmeter and test each capacitor for con-
tinuity by placing one probe in the wire connector
and the other probe against the opposite end termi-
nal of the capacitor, If capacitor has been removed,
removed.
place probes on the end terminals of capacitor. Meter should read zero resistance. If meter reading
is infinity, replace capacitor.
Using volt ohmmeter, place one probe against capacitor body and other probe against capacitor end
terminal. Test each capacitor separately. Meter should read infinity. If meter does not show
infinite resistance, replace capacitor.
4-46