TM 10-7310-241-12&P
Change 1 4-14.1
4-14. REPLACEMENT OF LATCH ASSEMBLY FOR MODEL RAK-15 (Continued)
CAUTION
DAMAGE TO SCREWS. In step (3), use standard hand tools to install
the mounting screws (3) and only tighten with sufficient torque to
ensure that the latch assembly (4) is held firmly in position. The
application of excessive torque can result in damage to the mounting
screws (3).
(3) Install and tighten three mounting screws (3).
(4) Install the inner container (Subparagraph 4-13b, step (1)).
(5) Install the cover (Subparagraph 2-9a, steps (8) and (9)).
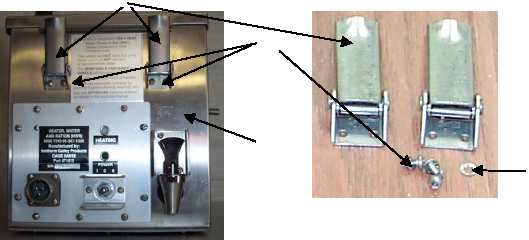
4-14.1. REPLACEMENT OF THE LATCH FOR MODEL 471012
INITIAL SETUP
Tools: Tool Kit, General Mechanics: Automotive (Appendix B, Section III, Item 1).
Parts/materials: Latch (fastener).
HWR Condition: Power off, cable disconnected, and cover removed (Subparagraph 4-12.1a. steps (1) and
(2)).
This task covers: a. Replacing the Latch.
b.
Installing the Latch.
c.
Adjusting the Latch.
1
2
3
4