TM 5-4520-240-14
threads of the compression fittings.
WARNING
(3) Connect the fuel supply line to the bulkhead fit-
Clean parts in a well-ventilated area.
ting and reconnect the power plug. Start the heater
Avoid inhalation of solvent fumes and
with the cover panels still removed and check for leak.
prolonged exposure of skin to cleaning
If any leakage is detected, shut off the heater, discon-
solvent. Wash exposed skin
nect the power plug, and correct the leak. Recheck
thoroughly. Dry cleaning solvent (fed.
heater operation and, when operation is satisfactory,
spec. P-D-680) used to clean parts is
reinstall the cover panels.
potentially dangerous to personnel
and property. Do not use near open
4-22. Fuel Pump.
flame or excessive heat. Flash point of
WARNING
solvent is 100F (38C).
The ignition system of this space
(1) Clean metal parts in dry cleaning solvent (fed.
heater contains dangerous voltages
spec. P-D-680) and allow all parts to dry thoroughly
which can cause severe electrical
before assembly.
shock. Be sure to disconnect the power
(2) Inspect the fuel tubes for cracks, worn spots,
plug before repairing the heater.
restrictions, and other damage. Replace damaged
a. Fuel Pump Filter Service.
tubes. The compression sleeves (2 and 13, fig. 4-10) and
NOTE
compression nuts (1 and 12) must be replaced when the
You can service the fuel pump filter without removing
fuel tubes are replaced.
the fuel pump from the heater case.
(3) Replace any fittings that are cracked or have
(1) Disconnect the power plug and shut off the fuel
damaged threads.
supply. Remove the top and side cover panels for access
d. Installation.
to the fuel pump filter.
(1) Install the fuel lines, fittings, and fuel strainer
CAUTION
in the reverse order of the index numbers in figure 4-10.
Have container available to catch fuel
when fuel pump cover is removed.
(2) Use Permatex No. 1, or equivalent, to coat the
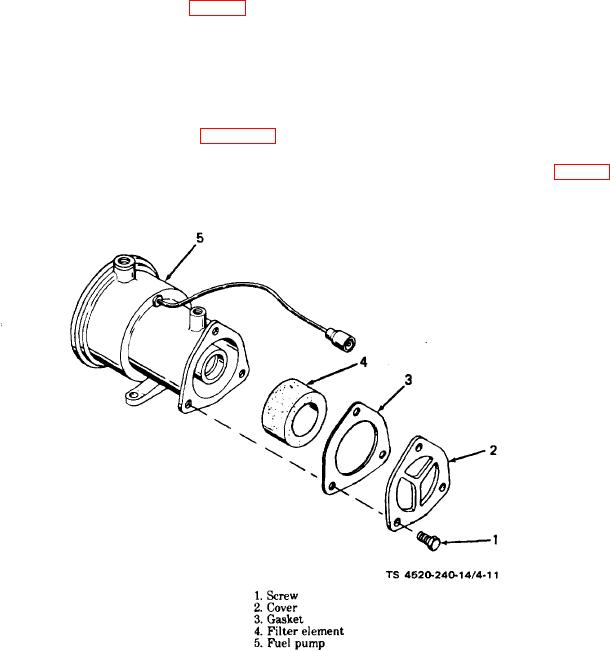
(2) Remove the three screws (1, fig. 4-11) securing
male NPT threads of the elbows (4, 10, and 15), plug (5),
the cover (2) to the fuel pump. Remove the cover, gasket
close nipple (9), and connector (16) before installing
(3), and filter element (4) from the fuel pump (5).
them. Do not apply any sealing compound to the
Figure 4-11. Fuel pump filter, exploded view.
4-16

