TM 9-2540-207-14&P
5.4.1
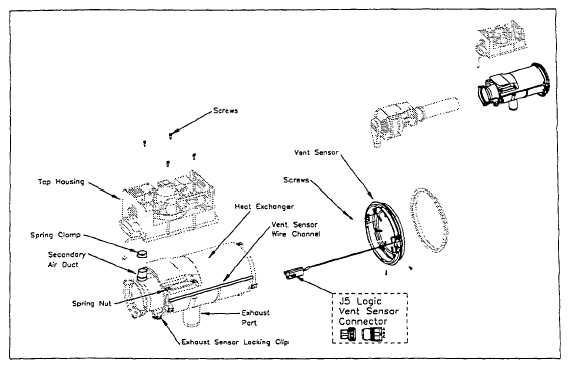
Heat Exchanger (continued)
Installation
Figure 5-4.4. Heat Exchanger Assembly, Installation
1.
Inspect the Heat Exchanger and check that it is fitted with eleven (11) #8 spring nuts.
2.
Inspect Secondary Air duct and replace if necessary.
3.
Install Vent Sensor onto the Heat Exchanger ensuring that the three (3) screw holes line up.
Note: Heat Shield must be located on inside face of Vent Sensor.
4.
Using a #2 cross-tip screwdriver, secure the Vent Sensor to the Heat Exchanger with three (3) screws.
5.
Place the Vent Sensor wire into the channel on the side of the Heat Exchanger ensuring that there is no strain on
the connections at the Vent Sensor end. Lightly re-crimp channel to secure Vent Sensor wire. Be careful not to
damage the wire during this procedure.
Note: Vent Sensor MUST be aligned as shown in Fig. 5-4.4 so that Vent Sensor
wire lays in Wire Channel of Exchanger
6.
Place the Top Housing onto the Heat Exchanger taking care not to trap or damage the Wiring Harness. Line up
Secondary Air Duct on underside of Top Housing over the air pipe of the Heat Exchanger.
7.
Using pliers, move one of the 1" metal spring clamps from the Top Housing end along the Secondary Air Duct
Hose and secure to the Heat Exchanger End.
8.
Using a #2 cross-tip screwdriver, secure the Top Housing to the Heat Exchanger using four (4) screws.
5-46