TM 9-2540-207-14&P
5.3.7
Burner Housing (continued)
Installation
1.
Apply Nickel anti-seize, Loctite 77164 to the threads on the Igniter Holder.
2.
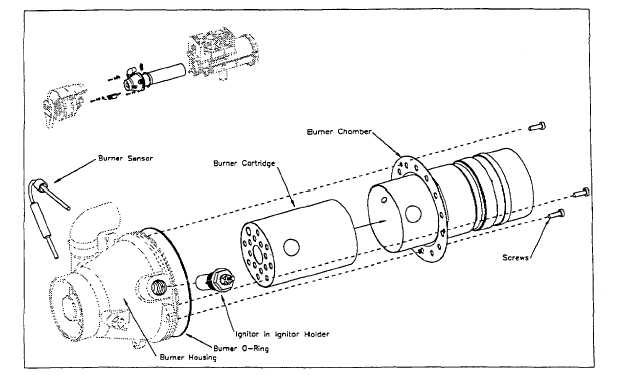
Insert the Burner Cartridge into the Burner Chamber, ensuring the two large holes in each part line up.
3.
Insert the Burner Cartridge with the Burner Chamber into the Burner Housing and at the same time screw in the
Igniter Holder ensuring the Igniter Holder enters the large hole in the other two parts. When all parts are lined up
secure the Igniter Holder using a 3/4" deep socket.
Note: The Burner Cartridge is held in place by the Igniter Holder passing into the
large hole.
Figure 5-3.15. Burner Cartridge, Chamber, Wick, Igniter and Igniter Holder - aligned
4.
Apply Loctite 242 (blue) to the three (3) screws, and using a #2 cross-tip screwdriver secure the Burner Chamber
to the Burner Housing using the three (3) screws.
5.
Coat a new Burner O-Ring with GAA grease and install the O-Ring onto the Burner Housing.
6.
Install Combustor Assembly (ref. 5.3.1)
7.
Install Vent Fan Assembly (ref. 5.2.1)
8.
Install Bottom Shell (ref. 5.1.3)
9.
Install Top Shell (ref. 5.1.2)
5-42