
TM 5-4520-208-15
Section X. HEATER EXHAUST SYSTEM
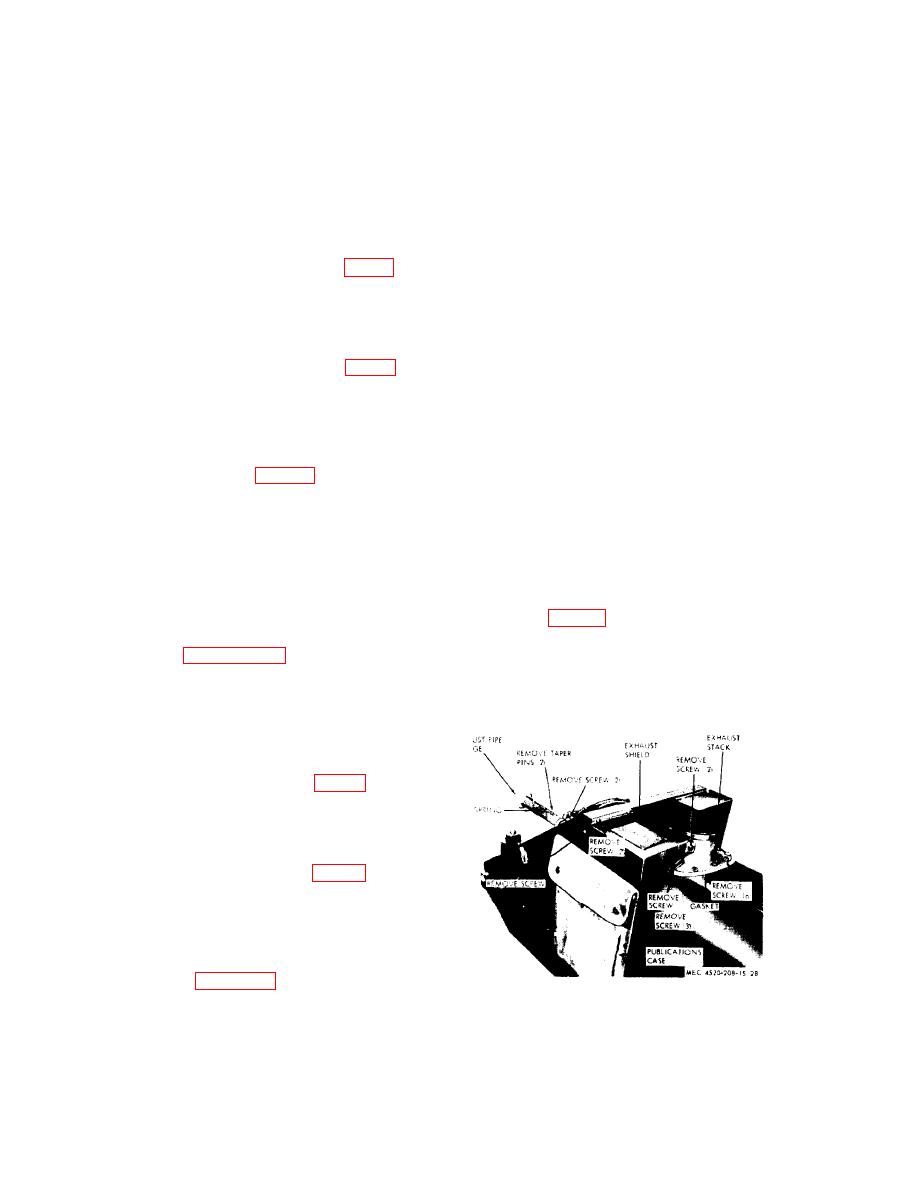
ing exhaust shield to bulkhead and
78. General
one screw and two flat washers se-
curing exhaust shield to exhaust stack.
the combustion chamber through the heat ex-
Remove exhaust shield.
changer and into the atmosphere through the
(6) Remove two screws, two lockwashers,
exhaust stack.
and two nuts securing exhaust pipe
b. Exhaust gages from the gasoline engine
flange to bulkhead.
power unit exhaust manifold muffler are
(7) Remove two screws, flat washers, and
carried by the engine exhaust pipe (19, fig. 24)
lockwashers and remove bracket and
to the heater exhaust pipe.
spacers securing exhaust pipe to fan
mounting ring.
79. Exhaust Pipes
(8) Remove two screws, flat washers, and
self-locking nuts securing exhaust
a. General.
(1) The engine exhaust. pipe (19, fig. 24)
pipe to exhaust stack. Remove exhaust
is connected to the engine muffler
pipe.
pipe. The outlet end of the pipe has
c. Cleaning, Inspection, and Repair.
(1) Clean all parts, except gasket, in an
a flange. When the gasoline engine
approved cleaning solvent and dry
is mounted on the heatar, the engine
exhaust pipe mates with the exhaust
thoroughly.
(2) Inspect parts for bends, breaks, cracks,
conductor (22, fig. 49) with the
lack of spring tension, torn gasket,
spring loaded flange' (23) forming a
gastight fitting.
or other damage.
(2) The exhaust pipe passes through a
(3) Straighten all minor bends and weld
flange in the bulkhead and is attached
small breaks or cracks. Replace all
to the exhaust stack. A sheet metal
unserviceable parts.
d. Installation.
shield surrounds the exhaust pipe out-
(1) Position the exhaust pipe on exhaust
side the cabinet to prevent accidental
stack (fig. 28) with exhaust pipe
burns to personnel.
extending through hole in bulkhead.
b. Removal.
Secure exhaust pipe to exhaust stack
(1) Refer to paragraph 12 and remove the
with two cap screws, flat washers, and
power unit from the heater.
selflocking nuts.
Warning: Allow heater and power
unit to cool off before attempting to
remove any part of the exhaust
system.
(2) Remove two screws (30, fig. 24) flat
washers (31), lockwashers (33), and
nuts (34) and remove exhaust pipe
(19) and gasket (32) from power
unit.
(3) Remove two taper pins (fig. 28) and
remove flange, spring, and exhaust
pipe connection.
(4) Remove three screws, nuts, flat wash-
ers, and lockwashers securing publica-
tions case to heaters and remove case.
(5) Refer to figure 28 and remove two
screws, lockwashers, and nuts secur-
Figure 28. Exhaust system, removal points.
48
