TM 9-2540-207-14&P
5.3.4
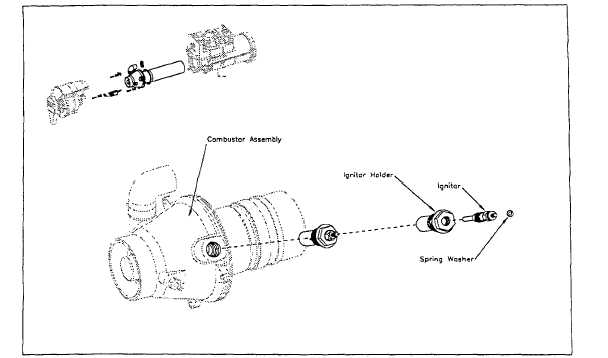
IGNITER HOLDER
Figure 5-3.5. Igniter Holder
Removal
1.
Remove Top Shell (ref. 5.1.2)
2.
Remove Bottom Shell (ref. 5.1.3)
3.
Remove Vent Fan Assembly (ref. 5.2.1)
4.
Remove Combustor Assembly (ref. 5.3.1)
5.
Using a 3/4" deep socket, remove Igniter Holder threaded into the Burner Housing.
Cleaning
1.
Remove the Igniter from the Holder using a 3/8" open ended wrench as well as a 3/4" open ended wrench to
hold the Holder. Using a wire brush clean the Holder. Remove any carbon deposits, especially in the space
between the Holder and the Igniter tip.
Installation
1.
Apply Nickel anti-seize (Loctite 77164) to the threads of the Igniter Holder.
2.
Check that the Igniter is firmly installed into the Igniter Holder.
Note: If the Igniter has been removed, coat the threads with Nickel anti-seize
(Loctite 77164) when installing.
!CAUTION!
Prior to reinstalling the Igniter Holder ensure that the threaded Igniter Holder
receptacle in the Burner Housing is fully aligned with the large holes in both the
Burner Chamber and the Burner Cartridge. If not, loosen the Burner Chamber
retaining screws and re-align all three holes with a finger. Re-tighten the Chamber
retaining screws only after the Igniter Holder has been successfully installed
through all three.
3.
Using a 3/4" deep socket install the Igniter Holder. DO NOT over tighten.
5-32