T M 9 - 4 9 3 1 - 3 8 1 - 1 4 & P - 2
FRAME 6
Remove Electron Tube, Retaining Strop, and CRT Support (Continued):
NOTE
Read paragraph 2-4 on replacing inserts before doing any
1.
2.
3.
4.
5.
6.
work.
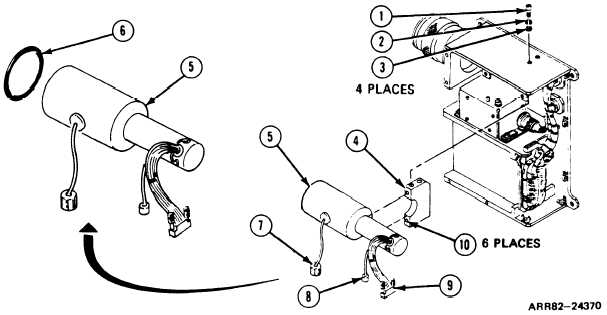
Unscrew and take out four machine screws (1), Iockwashers (2),
with screwdriver. Get rid of lockwashers (2).
Slide CRT support (4) as far toward rear of electron tube (5) as
and flat washers (3)
it will go.
Pull out electron tube assembly (5). Take preformed packing (6) from around
electron tube assembly (5). Get rid of packing (6).
Look at electron tube assembly (5) for cracks or damaged lead A3P1 (7) and
electrical lead A3P2 (8). If bad, turn in.
If plug A3P3 (9) is damaged, repair
electron tube assembly (5); refer to task 6.
If electron tube assembly (5) is OK, wrap it in packing and place in nesting tray so
plug A3P3 (9) is exposed. This is to protect electron tube assembly (5) for later use.
Take out CRT support (4). Look at support (4) for loose screw thread inserts (10).
Replace any bad inserts (10). If OK, set aside for later use.
Follow-on Maintenance:
NOTE: To install electron tube assembly, refer to task 14.
TASK 5 ENDS HERE
Volume IV
Para. 2-8, Task 5
2-171